An Introduction to Warhammer Underworlds' latest Death Warband
Take a deep dive with Gareth regarding the newest (and potentially strongest?) death warband to hit the Warhammer Underworlds scene!
Gareth Davies
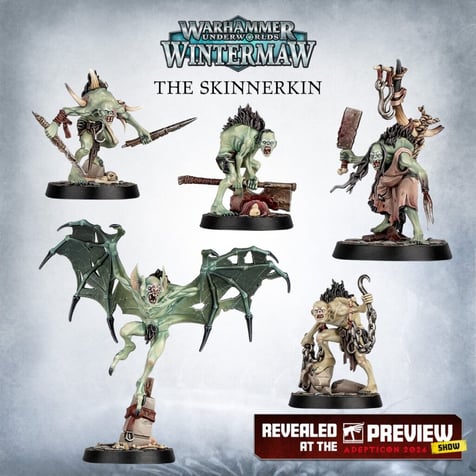
The Skinnerkin are a 5 fighter warband with an aggressive play style. They were released in the Wintermaw core box. Across this glutonous group we have a respectable 16 wounds, even more impressive is the 22 glory ceiling across both objective and power decks. They have a central core mechanic around accumulating Haunch counters. Haunch is essentially delicous thigh meat to gorge upon. Mechanically Haunch counters are very important to this warband. Haunch counters are how they inspire, and they have many power cards and objectives centered around them. Haunch counters are attached to you (the player) so even if all of your warband are out of action it does not affect the Haunch you have gathered. Unlike some previous counters-generated themed warbands you can produce meat like crazy and often end up producing more than 10 Hauch counters in a game. Other than that the Skinnerkin have a great selection of easily scorable surge cards within their rivals deck.
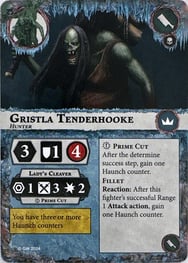
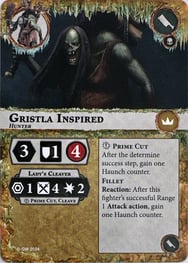
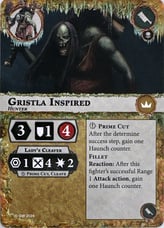
The leading lady of the Skinnerkin. She has only 4 Wounds and 1 Shield as a defensive profile, so she can be taken out quickly if left exposed. Her slow movement at only 3 hexes only adds to this issue as she must be close enough to be able to get into the fight. Gristla at least has quite an accurate Range 1 attack at 3 Swords which hits for 2 Damage. Criticially she is a hungry lady, because of this she is your most reliable source of Haunch counters. As part of her attack, she has the Prime Cut ability which provides you with a Haunch counter for rolling a crit. Additionally, whenever she makes a successful range 1 attack action, she generates another Haunch counter (through the Fillet reaction). This combination makes Gristla an abundant source of Haunch counters. Once inspired she gains an additional sword and Cleave in her attack. Taking her up to 4 swords with Cleave which is a highly accurate attack meaning you are more likely to generate even more Haunch counters!
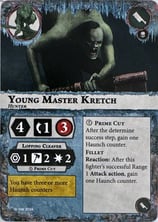
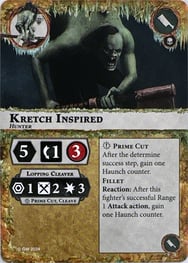
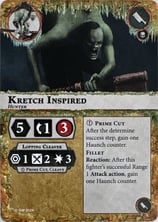
Kretch is your second most important fighter as he has the same Prime Cut and Fillet abilities to generate Haunch counters. Which makes it more devastating that he is even more vulnerable at only 3 Wounds and 1 Dodge. He is at least a bit faster than Gristla at 4 movement so you can have him a bit more in the backline and away from danger. Offensively he is rolling 2 Hammers for 2 damage at Range 1 which has a higher chance of getting a success but a lower chance of getting a crit for that delicious second Haunch counter. Once inspired he goes up to a rapid 5 movement, increases his damage to 3, and gains Cleave. However, he does go down to 2 swords making his attack quite inaccurate without supporting fighers. It should be your primary gameplay to land as many attacks as possible with both Gristla and Kretch by any means possible.

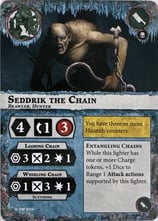
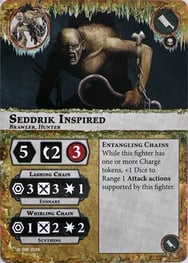
I'll start with the bad new, Seddrik does not innately generate any Haunch counters. Defencively he is just as vulnerable as Kretch at 3 Wounds and 1 Dodge. He is also matching Kretch's speed at 4 movement. Seddrik has two different attack profiles a Range 3 attack rolling 2 Swords for 1 damage. As well as a Range 1 attack with Scything rolling 3 swords for 1 damage. The sauce that Seddrik adds to the meat is in his special ability Entangling Chains which grants fighters supported by him an additional dice in their range 1 attack actions if he has a charge token. Meaining you can charge him in round 1 to make his Scything attack on some enemy fighers. Then use him for supports to make Gristla and Kretch more accurate. Once inspired things get strange for Seddrik. He gets an extra movement and dice in defence which is great for his surviability. His range 3 attack gets an extra Sword up to 3 and gain Ensare. But his scything range 1 attack goes down to 2 Swords and up to 2 damage. Functionally you should still utilise him the same to provid extra dice to other fighters.


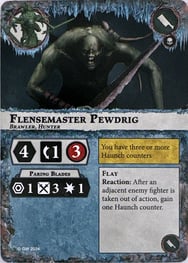
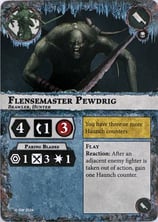
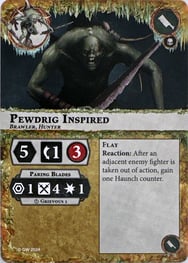
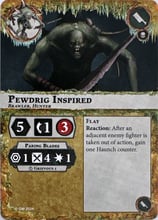
Pewdrig is a bit of a wet lettuce when uninspired. He is a 4-move fighter with 3 Wounds and 1 Dodge. His attack is 3 Swords for 1 damage. So he isn't that accurate and only deals 1 damage which is achievable with numerous power cards in Nemesis. The only good point for Pewdrig is that he can at least generate some Haunch counters. If an adjacent fighter is taken out of action you gain a Haunch counter through the Flay reaction. This makes him your best bet for charging in on your first activiation and trying to use some supports. You will not mind if he gets targetted over anyone else so chuck him in there.Once inspired he becomes more of a threat going to 5 movement, 4 Swords in his attack, and gaining a much needed Grievous 1. If you're rolling 4 dice you have a 50% chance of rolling a crit so functionally you can call it 0.5 damage gain.
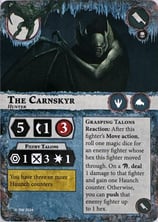
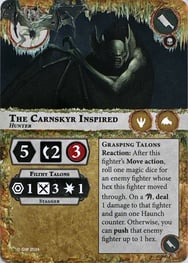
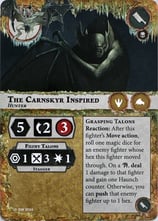
Carnskyr is a flying beast starting with 5 movement, 1 Dodge, and 3 Wounds. He also has the tademark Skinnerkin attack profile of 3 Swords for 1 Damage. Personally I love this bat, not least beacuse he has the Grasping Talons reaction. After a movement that goes through an enemy fighter is made you roll 1 Magic dice. On a Lightning, you deal 1 damage to the fighter and gain a Haunch counter. If not, you still get to push said fighter, so you always get something. If there is an enemy fighter adajent to a Lethal hex then you can effectively guarantee the 1 damage. Once inspired the Carnskyr gains an extra Dodge and Stagger in his attack. From herein I may refer to "the bat" when I do I am refering to Carnskyr.

The following ranking system designed to provide a quick measure of the playability of the cards in the Nemesis format. This means at a quick glance you have a broad understanding of the playability of the card in Nemesis.
Must play - These cards are above and beyond everything else. They either are outright powerful and consistent, or synergise greatly with the gameplan of the warband. You should be running these cards in any build. These cards can mean the difference between a win and a loss.
Reliable play - These cards are reasonably reliable and still effective cards to play. They have a material impact on the outcome of the game.
Conditional play - These cards are useful in some types of build, they are situational. In some builds they may be a must play and in others a never play. You really have to evaluate what the gameplan is and what other cards are required for them to be useful.
Never play - These are dead ducks in the water. Cards that are either unlikely to do anything or go massively against the warbands core gameplan that they should never be run.
Rating System
Objective Cards
Surges
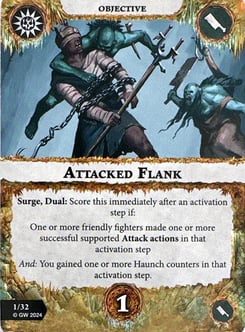
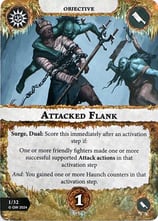
Attacked flank - Reliable play
Having supporting fighters helps Gristla and Kretch land their hits. If they land their hits, then you gain a Haunch and you score this card. Making this quite a consistent scorer in the early game when you have plenty of fighters. There is also the potential to land the Lightning with the bat and make a supported attack action or to get it from Pewdrigs Flay reaction. The only challenge is lategame if you cannot set up a support or have too many fighters out of action.
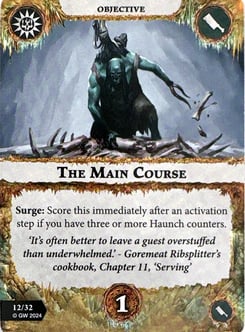
The Main Course - Must play
You already want to get up to three Haunch counters to inspire and with some luck you can achieve this after only two activations. Then you score this after any activation. Easy to score early, late, even if you are wiped out. This is a must take in any nemesis pairing.

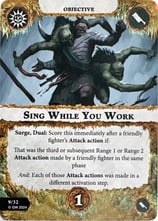
Sing While You Work - Must play
Make three attack actions. Early game this is a must keep, achievable with only three charge actions. Late game you can struggle if you only have one or two fighers and your opponent is not looking to engage with you since you only have 1 figher with a Range 3 attack action and everyone else is stuck at Range 1.
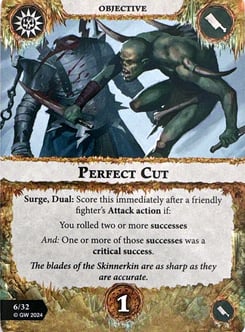
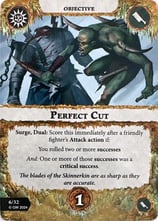
Perfect Cut - Reliable play
If you land a crit your attack is likely to land in which case, you shall score this card. Late game it might prove more difficult if you lose your fighters throwing more dice. Inspired Gristla and Pewdrig have a 40% chance to make this happen without any supports on their 4 Swords attack. All your 3 Sword fighters have a 26% chance to score this card.
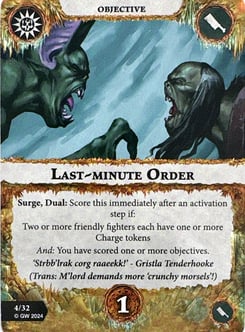
Last Minute Orders - Must play
You only need to score 1 other objective and then have made two charges. The only situation you struggle is if you have had too many fighters die. They can also kill one of your fighers with a charge token before you can make the second charge as some counterplay which is definitely worth considering if you are up against the Skinnerkin and they are yet to score this card.
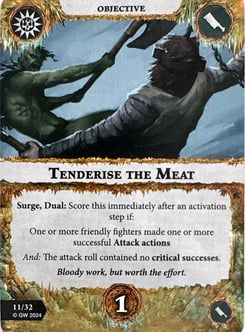
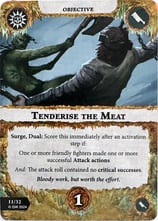
Tenderise the Meat - Never play
Rolling no crits in a warband mostly rolling swords is not a good way to be able to hit attacks. In a warband rolling hammers it would be more playable but the combination of eliminating crits and requiring successes hits this objective hard.
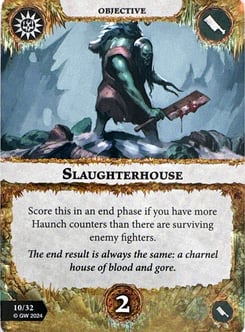
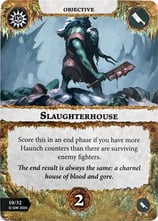
Slaughterhouse - Reliable play
Unless you are in a massive hoard meta it should be quite easy to score as 5 or more Haunch counters is not an impossible task in round 1. You even score it if your warband is wiped so highly consistent two glory. You should expect to gain 2-5 Haunch counters in the first round, so how many warbands have 4 or less fighters? 29 out of the 56 warbands! So for over half the warbands in the game this is expected round 1 score. Against most other warbands it should be achievable in rounds 2 and 3.
End Phases
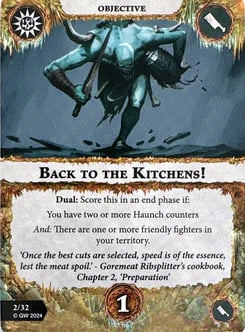
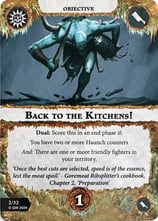
Back to the Kitchens! - Reliable play
An easy early game score as you should be getting two Haunch counters in round 1. If all your fighters die you cannot score it, which can happens when playing aggressively with this warband. If you have enough Haunch counters to score what you need to it is typically best to run away and cash in at the end of the game than to fight to the death. Only 1 glory but worth taking.

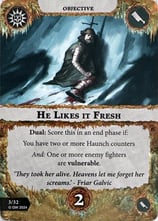
He Likes it Fresh - Never play
Whilst two or more Haunch counters is easy, it can be impossible to get into a situation where an enemy fighter is vulnerable on purpose. Either you are leaving a fighter alive when you could have otherwise eliminated the threat. Or they have a heal card which are more present than ever, and they keep you off it. It is problematic from your decision making to be trying to score this card.

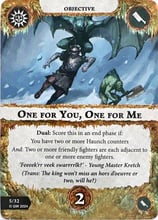
One for You, One for Me - Never play
If you charge in to surround a charged-out model in the first round and you miss you won't get any Haunch counters, so you won't satisfy the Haunch counterpart. If you charge in and hit the surrounded fighter you are likely to have killed them. Or they can have a push, or they can charge back your fighters to drive then back. So much counterplay and you are not scoring this in enough situations for it to ever be consistent.
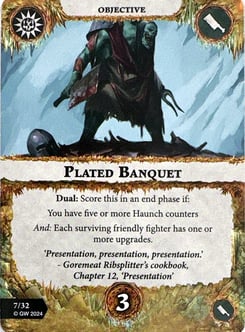
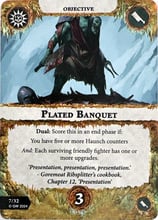
Plated Banquet - Reliable play
Getting 5 haunch counters is easy and you should get plenty of seed glory to be able to spend on upgrades for your fighters. Furthermore, you only need one surviving fighter to score this, so it is a very nice three-glory end phase. Another great reason for you to pack your Haunch counters up in a bag a fly away to the corner of the board with the bat in round 3.
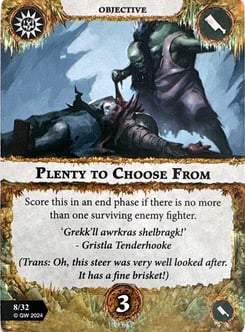
Plenty to Choose From - Reliable play
Whilst not impossible to kill all but one enemy fighter it is still a significant challenge and impossible in some match ups. Usually if you are scoring this you are already winning so it is a bit win more. Nonetheless I would be tempted to run it as a 3-glory third end phase. If you are running it focus on killing smaller fighters and don't worry if you leave a big man on the board.
Power Cards
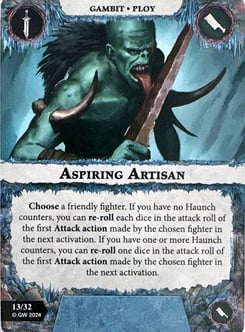
Aspiring Artisan - Must play
Rerolls on all dice in the first round is amazing and can get you off to a rolling start so to speak. Once you've got some Haunch counters a single reroll is always useful so long as you have attacks to be made. This card really pulls its weight in getting you those crits when needed.

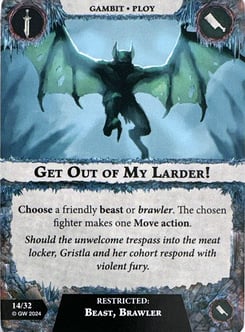
Get Out of My Larder! - Must play
3 of your 5 fighters can be moved with this card and they are not typically the fighters that the opposition will be focusing down. Also, you can move Seddrik after he has charged to set up a support with an additional dice! If all these fighters are out of action you can cycle the objective. You can also move the bat and make the reaction to attempt a ping. Never a dead card and when played has massive implications on the outcome of the game.
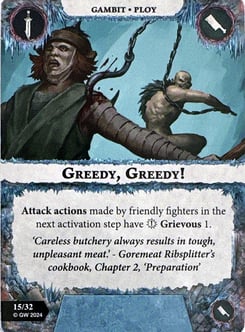
Greedy, Greedy! - Never play
Greedy indeed, if you're rolling a crit, you're already winning with this warband. You're also not that likely to even roll a crit after playing this and if you do it is only 1 additional damage. Not impactful or consistent and worth passing.
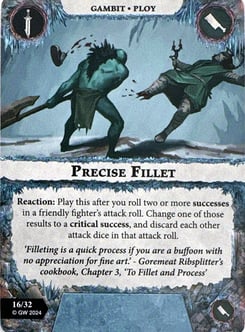
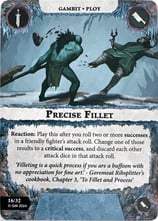
Precise Fillet - Never play
You two fighters best attack gain cleave, so if you had two successes against shield, they would be looking for a crit anyway. Against two dodge fighters they are looking to crit defend usually. Not a worthwhile effect for a narrow situation.
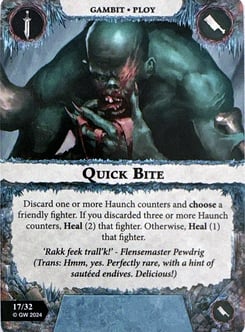
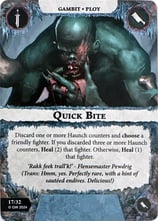
Quick Bite - Never play
You may or may not always have enough Haunch counters to afford this heal or it be useful for you in your current situation. However, when you heal up one of your two most important fighters to get an extra attack with them it will feel very impactful. The critical issue with this card is that is uses your Haunch counters when you want to be using them to get Glory.
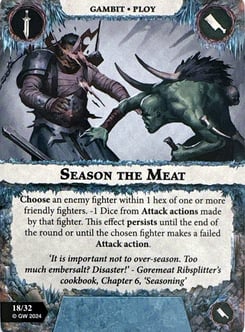
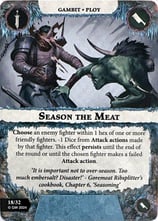
Season the Meat - Reliable play
Charge their best fighter and give them minus 1 dice until they make a failed attack action. This card can heavily impact big man warbands and fighters with 3 damage attacks which are lethal to your warband.

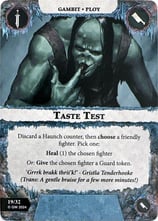
Taste Test - Never play
Even more healing with the potential to guard instead. Requires a situation where a heal 1 would affect the number of attacks to take a fighter out. This has the same underlying issue of competing for the valuable Haunch counters.
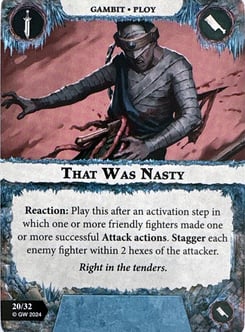

That Was Nasty - Never play
This can stagger multiple enemy fighters or only the one you care about, and the attack can be performed by a less useful fighter early. Therefore, increasing reliability of more important fighters later in the round. It is really hit hard by requiring a successful attack action, if you charge in a miss you may get no value out of this card.
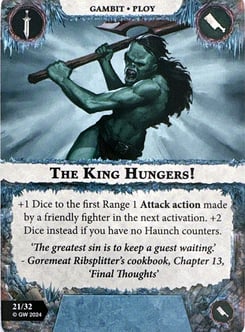
The King Hungers - Must play
An extra dice is crucial for this warband and first round it can be two extra dice! Solidifying the first hit landing and giving good odds of getting a crit. Unless you have already won this card will be useful.
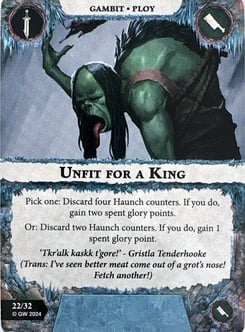
Unfit for a King - Must play
This is represents two additional Glory within the power deck. That is potentially game winning and something that you should be actively trying to make work within your gameplan. Try to score the objectives that require Haunch counters to score first then cash this card in. When you are running this card keep any hand without this card in and mulligan any hand with it in. You should be able to score enough early Glory with the Skinnerkin that you can put down all your upgrades.
Gambits
Upgrades
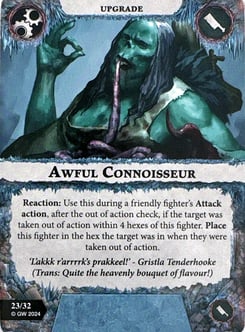

Awful Connoisseur - Conditional play
There is such a narrow window when this card is going to be activated and when it is going to be useful. You must take another fighter out of action with an attack and then benefit from being back to effectively push your other fighter up the board. The majority of your warband is fast enough to get where they need to be. That being said, Gristla is positively lethargic and this could teleport her further than she would be willing to move herself.
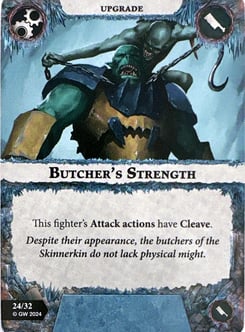
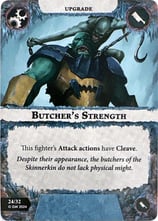
Butchers Strength - Conditional play
Both Kretch and Gristla get cleave when they inspire. You're throwing swords and fishing for crits anyway. The only useful application is putting this on Seddrik to try and land scything attacks against horde warbands more consistently.

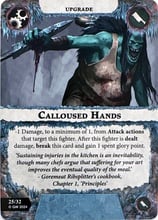
Calloused Hands - Must play
Now this is a card! A must-play on either Kretch or Gristla. You can disincentivise attacking your best fighters and then gain glory even if they do attack them. Also keeps them in range of healing from your other cards. Must play in Nemesis.
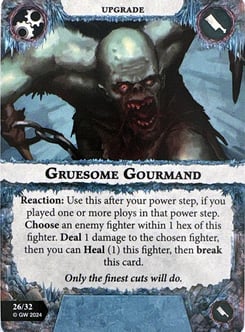
Gruesome Gourmand - Reliable play
What did we just say about healing? This is a heal and a ping and when run as a packaging you can really get a lot of mileage out of your fighters. It can be a bit finicky but I would suggest putting this upgrade on your fighter in your power step when they are next to the fighter you want to ping and you have a power card that you want to play. This greatly reduces any counterplay.
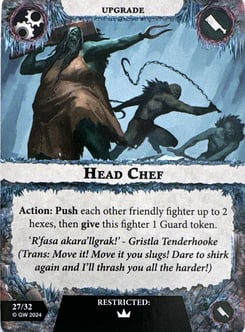
Head Chef - Never run
Push each other friendly fighter! You become the warden on mass and without move tokens. That being said you really want to be charging in with this warband. This potentially enables some holding strategies, but it just does not play well with everything else that the Skinnerkin does.
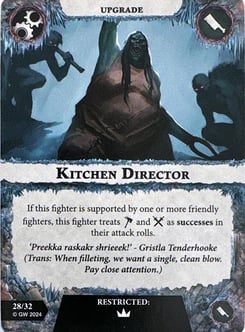
Kitchen Director - Reliable play
If Gristla is inspired and supported by Seddrik you are 5 rolling dice, only missing on doubles, with cleave. That is an incredibly accurate attack profile and very fun to roll. With support from a non-Seddrik fighter you are only on 4 dice missing on doubles with Cleave. That is a 99.9% chance to roll a single success and an 86% chance to roll 3 successes, against any fighter with a single Shield they need to get a crit in 99.9% of the cases. If Gristla is dead, you get to loot it away for free.
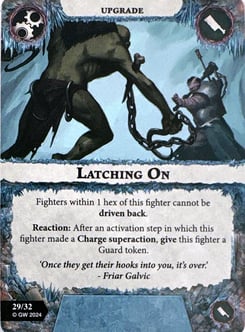
Latching On - Conditional play
You do want to be charging in and surrounding your target which this enables. However, it does not often feel as though it enabled any winning plays that would not have been achievable otherwise.
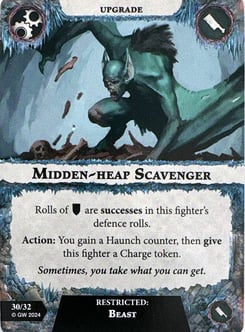
Midden-heap Scavenger - Must play
The bat can effectively be permanently on guard and provide Haunch counters easily. 2 dice on guard is nice but it does not make the bat a scary fighter. At least you can cycle the upgrade out if the bat is dead. If you only have the bat left then you can sit in the corner of the board and produce Haunch counters from... somewhere.
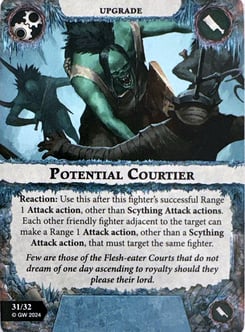

Potential Courtier - Reliable play
This is how you can make multiple attack actions gain many Haunch counters and more importantly, take out the tougher enemy fighters. It can be that you don't land your attack with the fighter this upgrade is on and thus it does nothing, also worth noting is that not many fighters are likely to live through 4+ attacks. This upgrade does a lot of work for the Skinnerkin when it goes off.

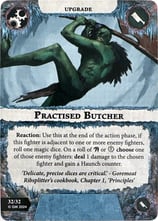
Practiced Butcher - Reliable play
Getting extra Haunch counters is nice and if you are next to an enemy fighter, it is quite reliable. Playing it right before the end of the round is the most likely way to pull this off at least once in a game and there are situations that you can really make some good meat from this card.
Charging in with Seddrik is a valuable first or second activation if you're looking to set up some support to give that extra attack dice.
If you only have the bat left, then you can run circles around your opponent making move actions backwards and forwards to whittle them down.
Pewdrig is also a nice model to charge in ahead at the start to set up supports as he is less important to your game plan.
Make sure that Gristla can get into an attack round 1 as she is your most consistent source of Haunch counters.
Kretch is your only way to deal 3 damage when he is inspired so try to keep him alive.
Because of the way that this warbands best objective cards score it is important to keep at least 1 fighter alive until the end of the game.
Tips & Tricks
Nemesis Pairings
Some potentially good nemesis pairings for the Skinnerkin are
Rimewyrm's Bite - This pairing has some great ping cards and easily scorable objectives as well as another healing card! There is also an upgrade that makes adjacent hexes to a figher lethals, slap it on the bat and you're getting that ping one way or anther.
Voidcurse Thralls - Provides the usual movement shenanigans expected but also upgrades many of your fighters to 1 shield making them at least reflect 1 attack more consistently. It may be a challenge to run all of the require cards which spread the curse and get in enough of the Skinnerkins great power cards.
Breakneck Slaughter - The scoring in this deck for any aggressive warband is second to none. Skinnerkin already have good scoring so you may even want to go up to 13 or 14 objectives.
Closing Thoughts
Okay maybe I jumped the gun a bit with strongest death warband, I admit that. But you should give the Skinnerkin a fair shot, they are a BLAST to play. You are throwing so many dice, you can make food puns at your opponent, and the glory really does flood in. They are also available to purchase new in the most recent core set making them easily accessible to new players not only in playstyle but also availability. This core box also includes all the new boards, dice, rules, and two extra universal decks for nemesis which we shall be reviewing as well. Oh and they have some lightning bois if that is your kind of thing but we are leaving that in the capable hands of James Waters to see if he can provide some avenues for abuse. Thank you for taking the time to read through my warband review and please get in touch if you have any thought!